

Long gone are the days when side dishes were a mere afterthought. They are now one of the strongest aspects of any meal, offering additional flavours and textures to spice up any mid-week dish. Whether you’re making a traditional Sunday roast or serving up a classic chicken stir-fry, the right accompaniment has the power to transform a simple plate into a restaurant-quality experience.
From tips and tricks to achieve the crispiest roast potatoes known to man to mastering smoky and authentic greens, we share some manageable and expert techniques for you to try at home. Here are just a select few of our tried-and-tested favourites suitable for all skill levels.
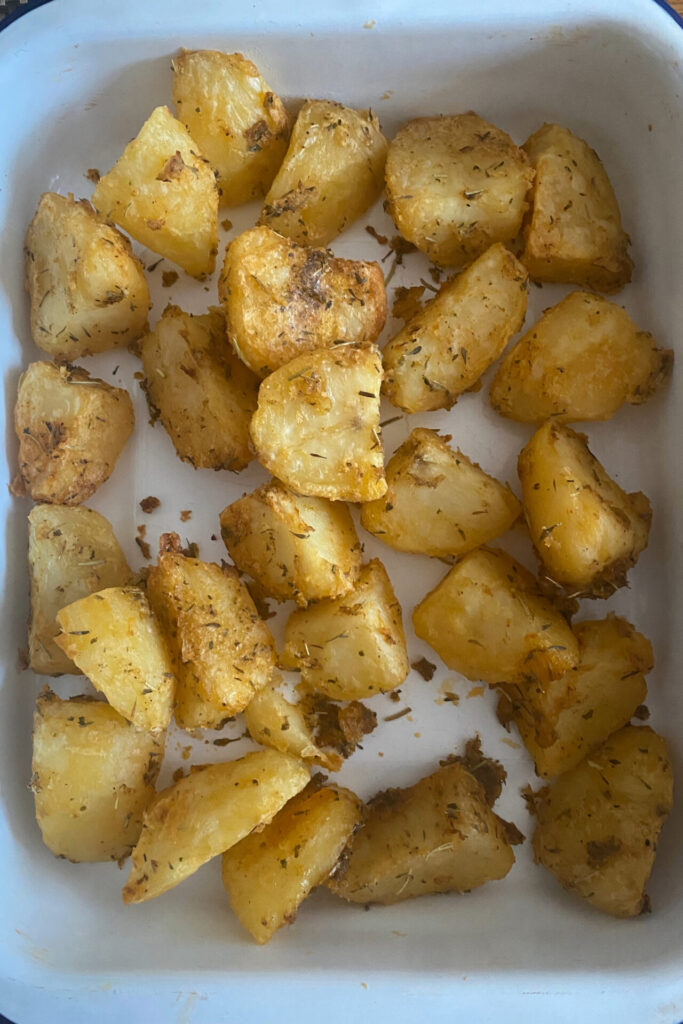
The Crispiest Roast Potatoes Recipe
As northerners, we’ve perfected our recipe for roast potatoes. If you’re making a traditional Sunday Roast, these are the perfect crispy companions.
Start by peeling your potatoes (Maris Piper or Russet are best) from top to bottom, removing any brown bits. For large and medium-sized potatoes, cut them in half; for smaller potatoes that you think could be a ‘roastie’ in their own right, leave them as is.
Fill a heavy-duty steel pan with cold water and add a teaspoon of baking soda. This is the key ingredient and is non-negotiable. It breaks down the exterior of the potato to create a paste that makes those crispy edges we know and love.
Turn the heat to high and leave the pan alone until you start to see the water begin to bubble. Take the pan off the heat and drain your potatoes in a colander. Give them a good shake to fluff them up. Let your potatoes air dry in the colander for at least 20 minutes, as the water will repel the oil. Better still, keep them in the fridge for a few hours.
Pre-heat the oven to 200°C and add your deep-dish baking tray, with around 0.5-1 cm of duck/goose fat or a neutral oil, such as vegetable oil or avocado oil. When the oil is boiling hot, add your potatoes. You can test this by dipping a wooden spoon into the oil to see if it bubbles.
The potatoes can then be left in the oven, only being turned over every 20 minutes or so. You’ll know when they’re ready when they develop a nice caramel colour and are hard when tapped. If they require to be cooked longer, turn the heat down slightly so they don’t burn. They usually take 40-60 minutes.
What Can I Season my Roast Potatoes With?
You can eat roast potatoes without any seasoning. Although, it’s quite common for those in the north to sprinkle over some salt flakes and cracked black pepper or diced rosemary before serving.
If you want to take your roast potatoes to another level, we recommend using our homemade rosemary and lemon salt seasoning. Simply chop up some fresh rosemary and half the zest of a lemon. Lay on a flat baking tray and place in the oven once your potatoes have finished cooking. Keep it turned off so it only dries and doesn’t burn.
After it has dried out, place it into a mortar along with a generous amount of salt. Grind it finely into a powder with a pestle. Then all you need to do is sprinkle on top of your potatoes – it’s a real game-changer.
Can I Freeze Roast Potatoes?
Yes, but do this only after you’ve parboiled your potatoes and before they’ve been cooked in the oven; otherwise, they won’t achieve that signature crisp. If anything, freezing them draws out the moisture more, meaning the oil can work its magic much better.
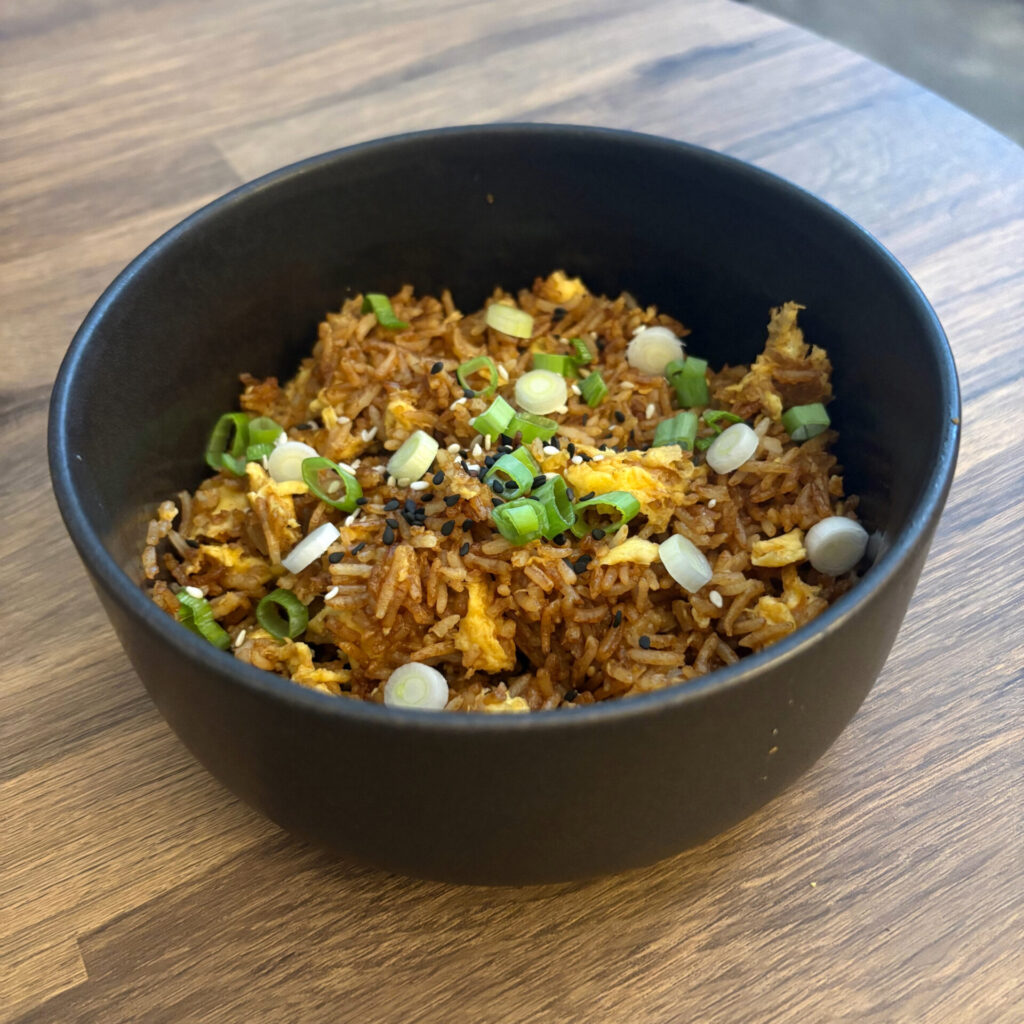
The Easiest Egg-Fried Rice Recipe
It can be tempting to grab a bag of rice from the supermarket out of ease. However, egg-fried rice is one of the tastiest yet easiest side dishes you can make. It’s the perfect side dish to go with some sticky chicken or stir-fried vegetables.
If you have the time, prepare your rice a day in advance. Leftover rice stored safely in the fridge is the secret to perfect fried rice. It sears in the oil as opposed to steaming, and evenly coats the grains. Alternatively, leave the rice to cool for at least 30 minutes and separate the grains with your hands before frying.
The first essential step is to wash your rice. Fill a bowl with water and sift through the rice, pouring away the cloudy excess starch. Repeat until the water turns clear.
Aim for a 1:1.5 ratio of rice to water to keep it al dente. You can weigh or measure these properly, but the easiest way is to find a small can-sized cup. Add everything to a pan and heat on high, bringing to a boil. Then reduce to the lowest setting. Place the lid on top and leave to simmer for around 13 minutes. Turn off the heat and keep the lid on top, allowing the steam to finish the cooking process. You should then be able to break up the grains gently with a fork.
In a wok or saucepan, heat a tablespoon of sesame oil (add in your garlic now if using fresh). While this gets hot, whisk your eggs in a bowl (we advise two eggs per one cup of rice). Add your cool rice to the pan and stir until everything is coated in the oil. Season to your taste with garlic powder (if not already added), dark soy sauce for colour, and light soy sauce for flavour. You can add some more sesame oil, too, if you wish.
Push your rice to the side of the pan and pour your eggs into the space. As the eggs start to solidify, stir them gently to break them into nice chunks and incorporate them into the rice before they cook fully. Give everything another good stir so that it’s nicely combined.
Can I Use a Rice Cooker?
Yes, rice cookers are much simpler and effective, but not everyone has access to niche kitchen equipment. If you’re looking to start introducing more rice dishes into your lifestyle, though, it’s a no-brainer. Follow the cooking instructions in your instruction manual. Usually it’ll say to use a cup of water per cup of rice, but this can differ.
Adding a small amount of neutral oil can prevent sticking, and make sure to select the ‘White Rice’ setting. When it finally notifies you that the process has finished, leave for 10 minutes before separating the grains.
What Can I Garnish Egg-Fried Rice With?
There’s no need to go overboard, since the dish is already full of flavour and isn’t meant to detract too much from your main meal. However, you can’t go wrong with some thinly sliced spring onions (both whites and greens). Other suitable additions include a sprinkle of toasted black and white sesame seeds or some fried garlic.
Can I Reheat Egg-Fried Rice?
This depends on whether you used day-old rice or made the fried rice the same day. You should never reheat rice more than once due to the potential of dangerous bacteria and toxins, especially if left to cool slowly or left at room temperature for more than an hour.
Ideally, you should only cook enough rice to eat for that meal. You can always freeze the rice you’ve cooked before frying and defrost it thoroughly, and then use it to make fried rice in the future. If there is any uncertainty as to how long rice has been stored in the fridge or freezer, the safest option is to make a new portion from scratch.
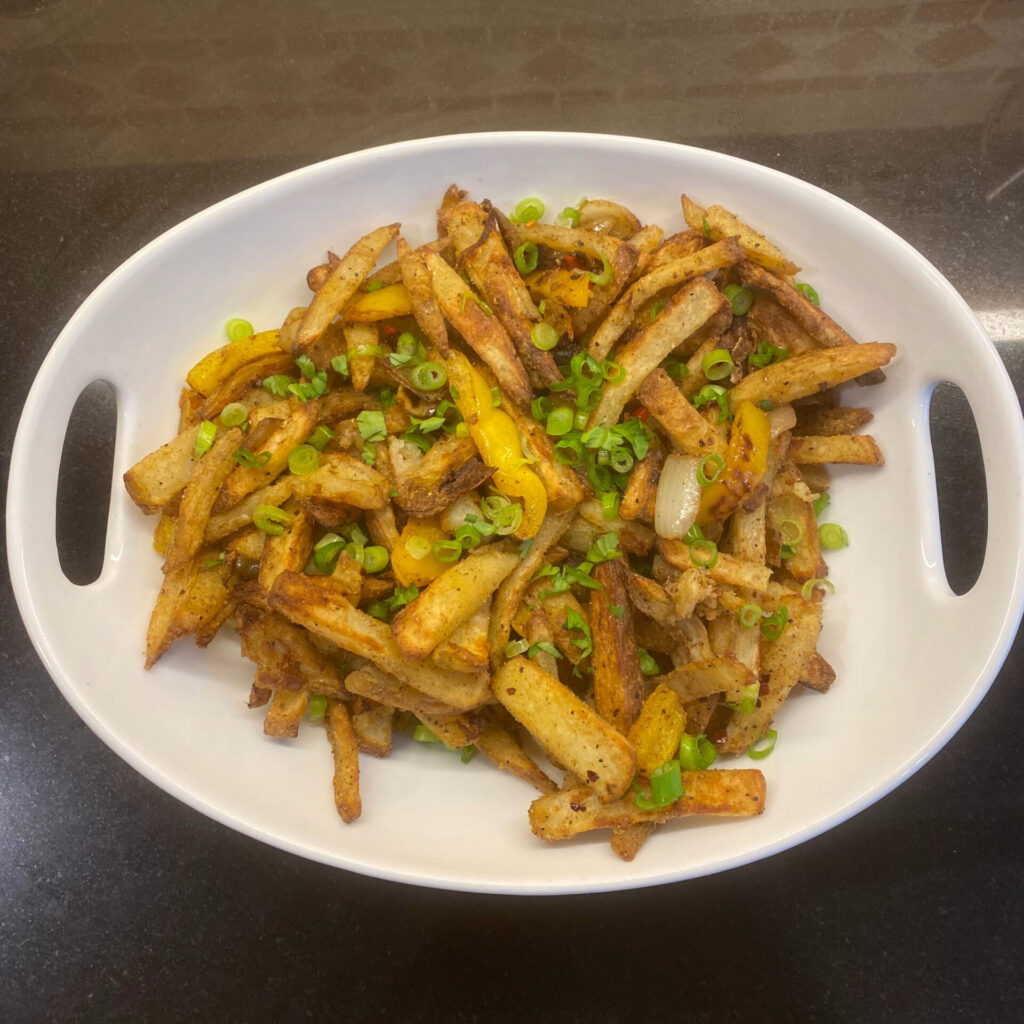
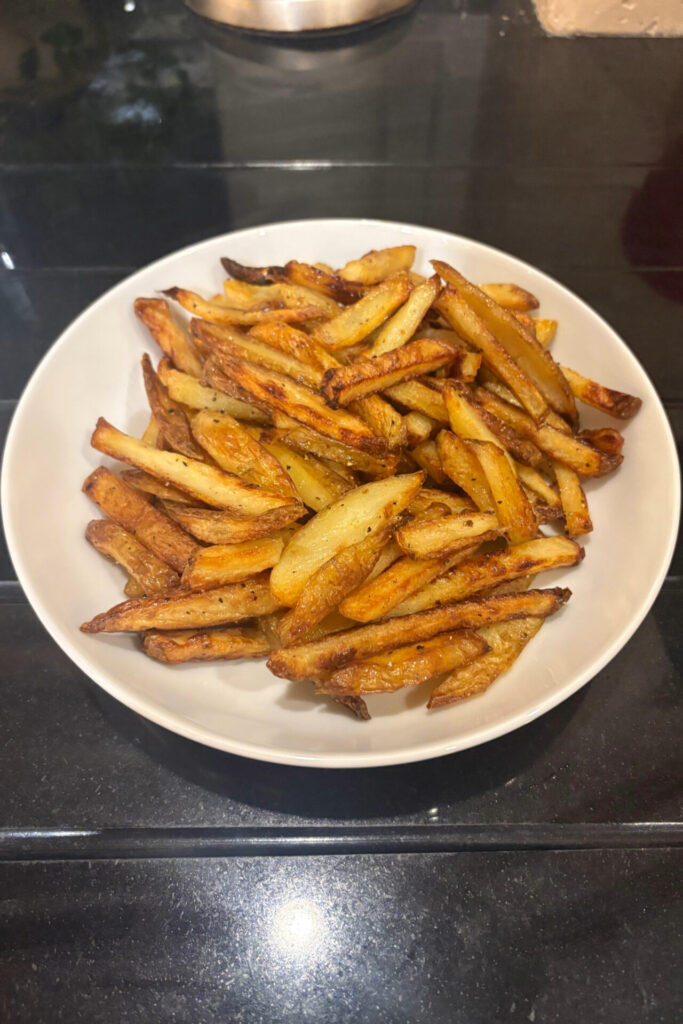
The Most Authentic Homemade Salt and Pepper Chips Recipe
Avoid buying frozen fries with our homemade oven chips recipe. They are fluffy on the inside crispy on the outside every time. Finish them with a classic British-Chinese salt and pepper seasoning to impress any guest.
Slice potatoes into thick batons. Submerge the chips in cold water for around half an hour to remove the excess starch and prevent sogginess.
Transfer to a large pan of salted cold water and bring to a boil. Once the water starts to boil (usually after 5-8 minutes), remove the pan from the heat and drain. Give the colander a slight shake to create a fluff-like texture and leave to cool completely.
Pre-heat the oven to 200°C and heat a generous glug of vegetable oil on a thick baking tray. Avoid olive oil as it has a low smoke point (so it doesn’t get hot enough) and can cause a bitter taste. Once the tray is hot, spread the chips on it, ensuring each is coated in oil.
Bake for 25-40 minutes, turning them over 15 minutes in. If they need a little longer, reduce the heat by 20°C.
While they crisp, mix your seasoning:
- 1 teaspoon salt
- ½ teaspoon cracked black pepper
- ½ teaspoon white caster sugar
- ½ teaspoon garlic powder
- ½ teaspoon Chinese Five-Spice powder
- 1 teaspoon chilli flakes
You’ll also need a sliced green chilli, a red and green pepper into thumb-sized pieces, and an onion sliced into strips. Sauté the chilli, onion, and pepper in a little vegetable oil for a minute so they keep their crunch. Once the chips are done, dry them on kitchen paper and toss them into the pan with the aromatics. Sprinkle over the seasoning, mix until coated, and serve with spring onions.
What Type of Potatoes Are Best?
The type of potato matters when it comes to making chips. The floury potato variety is key here to ensure a crispy exterior, with King Edward or Maris Piper being the best. We advise keeping the skin on the potatoes, so just make sure to wash them thoroughly and scrub the outside to remove dirt and debris.
Can I Make the Chips Without Salt?
Absolutely, rather than coating in the salt and pepper seasoning, you could instead opt for a black pepper and lemon fusion that is just as tasty. All you need to do is crush up some whole black pepper corns in a pestle and mortar and combine with fresh lemon zest. Alternatively, Grape Tree does a great Black Pepper and Lemon seasoning that we stand by.
Can I Cook the Chips in an Air Fryer?
Yes, you can easily prepare your chips in an air fryer. It’s tempting to do so, especially if you’ve invested in a fancy new model or prefer convenience. However, you may find your chips are darker on the outside and cook too quickly. Or, they become soggy due to overcrowding in the trays.
If you prefer to use an air fryer, coat your potatoes in a thin layer of oil. Set your machine to 180°C for 18-20 minutes. For added crunch, sprinkle over a little cornflour before you add your oil.
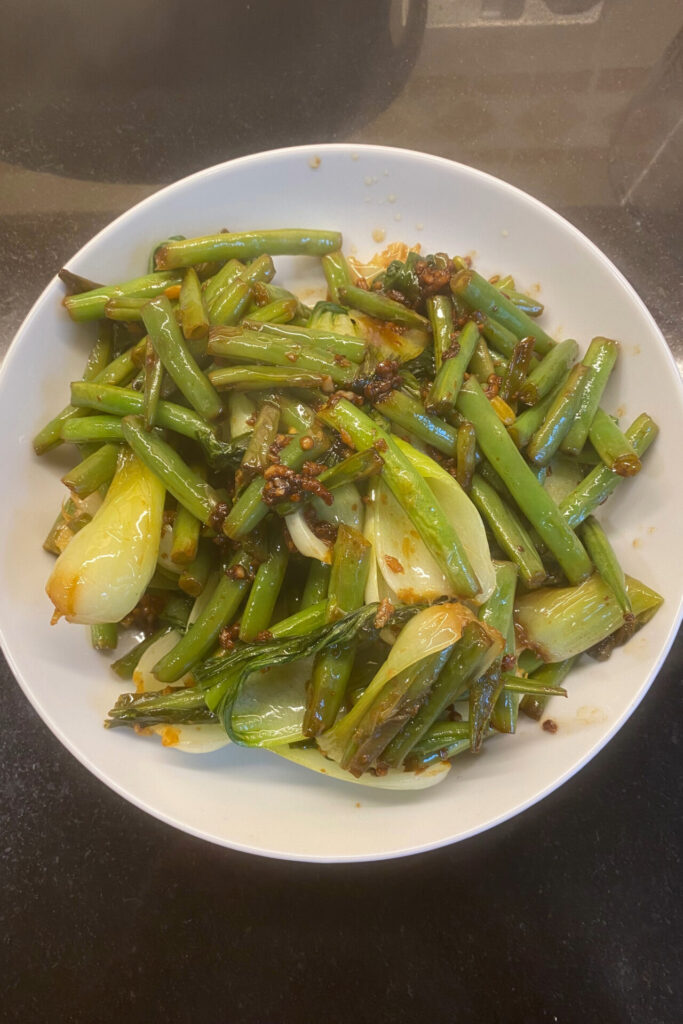
The Smokiest Stir-Fried Greens Recipe
Elevate your dishes with flavourful veg by following your guide to making smoky stir-fried greens. With only a handful of ingredients, cupboard staples, and a few minutes of your time, it’s one of the easiest side dishes to make after a busy day.
Start by preparing your vegetables. We suggest keeping it simple with green beans, bok choy, and spring onions. Wash and dry everything thoroughly, then break your bok choy apart into segments. With the beans, chop off the ends and cut them in half. For the spring onions, cut into 4-5 cm chunks and then thinly slice lengthways.
To achieve that smoky taste and perfect cooking temperature, a carbon steel wok or cast-iron skillet is best. A saucepan will work just as well, though. Heat a small amount of high-smoke-point oil (such as vegetable, grapeseed, or avocado oil) in your pan until a drop of water sizzles and evaporates instantly. Then add in your greens.
There’s no need to stir just yet, as you want the edges to blister a little. After about 40 seconds, push them to the side and add in some minced garlic and sliced red chillies. Let them toast for a few seconds before combining everything.
You don’t want too much liquid in the pan; otherwise, the greens will boil. Drizzle over a little sesame oil for that nutty taste, along with some light soy sauce and a splash of Shaoxing wine around the edges. A few drops of liquid smoke can add an extra smoky depth to the dish, but it isn’t a necessity.
Once the greens have turned a nice bright green and wilted slightly (but still solid enough to snap), you can remove them from the heat and serve instantly.
Can I Substitute the Soy Sauce for Something Else?
Yes, if you want to steer away from soy sauce in your dish, you can instead sauté with lots of garlic and some lemon zest. Or add a teaspoon of white miso paste with a little water at the end for an umami kick.
What Other Greens Can I Use?
This is a highly flexible recipe in which you can substitute any of your favourite vegetables for the ones in our recipe. Great alternatives include tenderstem broccoli, mushrooms, asparagus, water chestnuts, bamboo shoots, and mangetout. All of these can be found in most major UK supermarkets, too.

The Most Comforting Greek Butter Beans Recipe
Also called Gigantes Plaki, this Greek dish is both filling and fragrant. While they are traditionally baked in an oven, our recipe focuses on cooking using a stovetop only for ease. It’s the ideal side dish to have along with lamb chops and pork steaks. Or, you can have it on its own along with some crusty bread.
Finely dice half a large onion and mince one clove of garlic. Add to a saucepan or skillet with high-quality olive oil over a medium heat. Cook for around five minutes until they become fragrant. Then, stir in a teaspoon of tomato puree and cooking for another two minutes to remove the acidic flavour.
Drain your can of butter beans before adding them to the pan along with around 125 ml of vegetable stock. While you can add in additional salt here, it’s worth noting the stock and feta already enhance the saltiness of the dish. A little black pepper is enough.
Simmer for around 15 minutes until you find the stock has reduced into a thick sauce, and remove from the heat. Stir in a tablespoon of lemon juice and the zest of a quarter-lemon. Sprinkle some crumbled feta and dill on top.
How Do I Make the Sauce Thicker?
If you find that the sauce isn’t reducing enough, avoid cooking for longer so the beans don’t become mushy. Instead, crush up a few of the beans on the side of the pan and stir them back in. Watch as the starch instantly thickens the sauce.
Can I Add Any Greens to the Dish?
Of course, you could add a handful of fresh baby spinach or some kale. Do so a few minutes before removing from the heat. This will allow them to wilt just enough in time for serving.
Can I Use a Different Variety of Beans?
Butter beans are the most authentic and recommended for the recipe. If you can’t find any in your local supermarket or kitchen cupboards, cannellini beans, haricot beans, and borlotti beans will also work well. For smaller beans, reduce your cooking time by five or more minutes to prevent them from overcooking. If you are using dried beans, they must be soaked for 8-12 hours first and parboiled before adding them to the sauce.
Can I Make the Dish Vegan-Friendly?
Yes, you can swap out the feta for some vegan alternatives. The best option and most widely available one in UK supermarkets is Violife Greek White, which is similar in texture and has a salty tang. There’s also I AM NUT OK “Fetamorphosis”, which is made from almonds and fermented, giving it a more authentic flavour than cheeses made from coconut oil (but please avoid if you have a nut allergy).